Last updated Mar. 3, 2023 by Charles Zemub
It cannot be very safe if you’ve never used a check. But once you get the hang of it, you’ll wonder why this wasn’t your go-to payment method.
The key is to know what to write and where to write it on the check. In this post, we’ll walk through every step, so you’re ready to fill out your first checks like an expert.
Your information.
When you have a pen in hand, double-check the information on your check. If you don’t have a pen, consider this an excuse to visit the store and buy one. Cells are often overlooked as tools for remembering important information, but they can be instrumental in helping you remember what belongs on your check.
When using pencils or pens, there’s always the possibility of erasing things if you make a mistake (or if someone else does). In addition, pencils can snap when writing checks and leave small pieces behind that could get into your account number or other sensitive information on the review itself.
The same is true for pens—if it breaks while writing out a check at the bank counter or ATM, those pieces might get into other areas of your transaction, which could cause problems later down the line (like being stuck between letters).
In short: use pens/pencils when filling out checks because they’re easier than trying not together with banks making photocopies anyway, so why bother?
The date
The date should be in the same format as the rest of the information. It should also be written in black ink and a large font so that it can be easily read by someone who is visually impaired if they need to write checks out of their sight line, such as when holding an envelope with both hands.
The recipient’s name
The recipient’s name should be spelled correctly, written in total, and printed in the same font as the rest of the check. The recipient’s name should also be the same color as the rest of your statement.
Write the payment amount in words.
The payment amount should be written out in words, not just numbers. So, for example, if you’re writing a check for $25, write “twenty-five dollars” instead of “$25.”
The payment amount should be written as if it’s in the correct currency. So, for example, if you’re writing a check for $100 and you live in the United States, write “one hundred dollars.” (You’d also write “fifty pounds.”).
If you’re writing a check for $50 and live in Canada or Australia, however—where both possess an official currency called the Canadian dollar—you will write “fifty Canadian dollars” or “fifty Australian dollars,” respectively.
Write the payment amount in numbers.
You must write the payment amount in numbers, and this will help you avoid any confusion with your bank when they process your check and save time for whoever else may have to deal with it later on.
If you use words to describe what number is being paid (for example, “$5.00”), there could be more than one possible interpretation of those words depending on how they are interpreted.
If you are writing a check where an exact dollar amount is required (for example, if paying rent), make sure to include both numbers and words so that there is no ambiguity about how much money should be going toward rent each month or week. For example: “$700 per month.”
There are many acceptable ways to format your numbers when filling out checks: decimal points may or may not be included; commas can be used between groups of three digits; spaces may or may not exist between groups of four digits; and so on.
To avoid confusion during processing by whoever receives your payment request (whether that means cashiers at stores accepting checks or banks processing payments), make sure any formatting choices are consistent throughout all documents signed by one person over time—”the same hand,” as it were.
Memo line.
The memo line is the perfect spot to include a short note about the check. For example, you might write “Car payment” or “Clearing account.” If you’re paying a bill with your checkbook and have already filled in all your information, don’t worry about writing anything on this line.
To get your routing number from your checkbook, look at one of the checks inside it—it will be printed on the bottom right corner of the page where you write out checks.
Your routing number is always nine digits long, even if more than nine digits are printed on other parts of your checkbook (for example, if your bank uses magnetic ink character recognition technology and laser printing).
The routing number comprises two numbers: one group is five digits long, and the other is four digits long. The first set tells where your bank is located, while the second set tells which branch within that bank you’re using. For example, if your routing number begins with 0010000.
Routing and account number.
A routing number is a nine-digit number that identifies your bank. The account number is the same as the check number and can be found in the upper left-hand corner of your checks. To use a statement, you must have both numbers written on it to make sure it gets deposited into your account.
If you don’t have checks, ask your bank to send them or fill out an order form online if they don’t offer this service in person.
If you didn’t receive any of these forms in the mail after applying for one with our partner bank, contact their customer service team so they can help resolve any issues related to their service agreement with us or how we collect personal information from customers through our site (including how often we communicate with users).
This will ensure all parties understand what needs addressing before issuing any new documents required for normal operations at both ends.
Signature
Now that your check is correctly filled out, it’s time to sign it. It’s important to note that your signature should be legible and in the same spot on all your checks. When signing a statement, don’t forget to include your name.
It’s also vital not to sign a check if you don’t have enough funds in your account to cover it—this can lead to problems down the line when paying bills or cashing checks at stores.
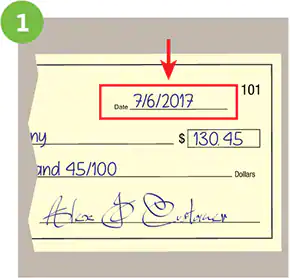
How to write the date on the check
To write the date on a check, put the month, day, and year in that Order. Use capital letters for each word if you’re writing it out by hand. For example:
JANUARY 1, 2019
However, if a machine prints your check, you must use numbers instead of text.
How to write a check online
The procedure for writing a check online is the same as writing a check offline. You will need to:
1. Find the online check template that works for you and print it out.
2. Fill in the blanks on your printed template with your information.
3. Sign and date your check.
4. Mail it off.
Frequently Asked Questions
What are the steps to fill out a check?
1. Write the check number in the upper left-hand corner of the check.
2. Write the payee’s name and address in the lower left-hand corner of the check.
3. Write your name and address in the lower right-hand corner of the check.
4. Write “For” or “Pay to” above your name on the line below your address, depending on whether you are writing a personal or business check.
5. Fill out all lines except signature lines, which should be left blank until you sign your name.
What are the six parts of writing a check?
The six parts of writing a check are:
1. Pay to the Order of, which is the name of the person or company that you’re writing the check to
2. The dollar amount of your check, in numbers and words
3. The date on which you wrote the check and when it’s due (if it’s an invoice)
4. The amount of money you want to be deducted from your account, in numbers and words
5. Your signature, written by hand or digitally
6. Your account number.
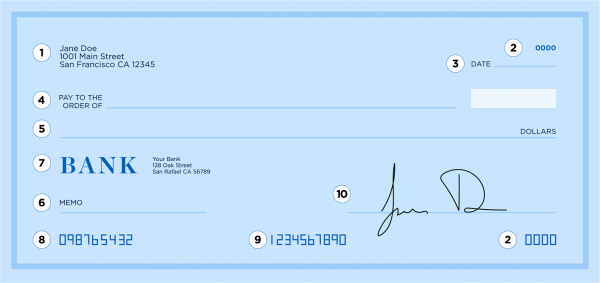
What are the 12 parts of a check?
1. Date
2. Total amount
3. Payee name
4. Payee address
5. Payee account # (if one exists)
6. Checksum, or MICR line (last four digits of the routing number)
7. Signature line
8. Payor’s name and address
9. Payor’s account # (if one exists)
10. A check number if one is assigned by the company writing the check (not necessarily required by law)
11. The check’s amount in words and numbers
12. The word “void.”
How do you write out a high school check?
When it comes to writing checks, it’s important to be able to write out a high school check. This is important so that you can pay for things like books, food, and school supplies. It’s also helpful if you want to buy something from someone else.
To write out a high school check, there are some steps that you need to follow. The first thing you need to do is fill in the review date.
Next, write out the name of the person who wrote the check. You should also include their address, phone number, and zip code so they can get their money back if anything happens to it while in transit.
Next comes the amount of money being paid; this should be clearly stated on the check so that there are no misunderstandings between parties involved in completing transactions using tabs instead of cash (which is illegal under federal law).
After this information has been written down correctly on your check form (or receipt), you should sign off on your work by putting your name underneath all these other details before sending it off into circulation.
Who signs the back of a check?
In most cases, the back of a check is signed by whoever made out the check. This can be anyone who has access to the checkbook and is authorized to sign checks on behalf of that account.
What are the parts of a checking account?
A checking account is made up of several parts, including:
Account number: This is the number your bank assigns to your account. It’s like a nickname for you and your money.
Checking account balance: This tells you how much money is in your account at any given time.
Checking account transaction history: This shows purchases with checks or debit cards from this checking account.
Dividends: The interest paid on a checking account balance every month or year, depending on the terms of your contract with the bank.
How do you write out numbers on a check?
You write out numbers on a check like you would write out a number in any other writing. The first digit is written out, followed by the word “and,” and then the next digit is written out.
For example, if you are writing out the number 100, you would write one hundred and then write another zero to signify that there are no more digits.
Conclusion.
You can ensure your check is filled out correctly by following the steps above. It’s important to know that some actions, such as the memo line or signature, are optional. The most important thing is to be consistent so that you and the recipient know each section’s meaning when looking at a check.